Monday, March 30, 2015

How to create a Gallery using HTML, CSS, jquery?

I am going to tell you to how to create a simple Gallery using HTML, CSS, Jquery. For this task you would need some images and knowlege of css and jquery.

There are some steps in creating it.

Step 1:-

First we create an index.html which would be our default page.

In index.html we create two divs. In which 1st div will contain the images to be displayed when we run index.html. The code goes like this:-

<div class="container">
<img src="img/1.jpg" width='200' data-img-no="0">
<img src="img/2.jpg" width='200' data-img-no="1" >
<img src="img/3.jpg" width='200' data-img-no="2">
<img src="img/4.jpg" width='200' data-img-no="3">
</div>

Here the data-img-no is the no given to each image.

Step 2:-

Now, we create a another div which will be display none by default but gets displayed when we click on an image.

This div will be:-

<div class="show">
<div class="prev">
<p>Prev</p>
</div>
<img class="close" src="img/1.jpg"  data-img-no="0">
<img class="close" src="img/2.jpg"  data-img-no="1">
<img class="close" src="img/3.jpg"  data-img-no="2">
<img class="close" src="img/4.jpg"  data-img-no="3">
<div class="next">
<p>Next</p>
</div>
</div>

In above div we again have 4 images with data-img-no same as the data-img-no in Step 1.
Here we have two Buttons or divs with name as next and prev which will be used for moving forward and backward the images.


Step 3:-

In this step we will give the above dives an custom css which goes as:-


.container
{
margin:0px auto;
width:820px;
margin-top:50px;
}
.container img
{
cursor:pointer;
}
.popup
{
position:absolute;
background:rgba(255,0,0,0.4);
width:100%;
height:100%;
top:0px;

}
.close
{
display:none;
cursor:pointer;

}

.show
{
display:none;

}
.close img
{
width:100px;
}
.prev
{
cursor:pointer;
float:left;

}
.next
{
cursor:pointer;
float:right;

}

after the step 3 we will get the index.html as shown below:-

 Now we move on to step 4 which is the most important part.

Step 4:-

Here we will give the our jquery code. In jquery code we will define the function for what will happen if we click on the image , next button, prev button Which div will be shown and which div will be hidden.

$(document).ready(function(){
var d;
var j=$(".container img:first").attr('data-img-no');
var i=$(".container img:last").attr('data-img-no');

    $("img").click(function(){
        d=$(this).attr('data-img-no');
        $(".show").addClass('popup');
        $(".close[data-img-no="+d+"]").css({display:"block",width:"50%",margin:"0px auto"});
        $(".show").css({display:"block"});
    });
   

    $(".next").click(function(){
    if(d < i)
    {
        d=parseInt(d) + 1;
        $(".close").css({display:"none"});
        $(".close[data-img-no="+d+"]").css({display:"block",width:"50%",margin:"0px auto"});
        $(".show").css({display:"block"});
    }
    });

    $(".prev").click(function(){
    if(d > j)
    {
        d=parseInt(d) - 1;
        $(".close").css({display:"none"});
        $(".close[data-img-no="+d+"]").css({display:"block",width:"50%",margin:"0px auto"});
        $(".show").css({display:"block"});
    }
    });
   
    $(".close").click(function(){
        $(".show").removeClass('popup');
        $(".close").css({display:"none"});
        $(".show").css({display:"none"});
    });
   
});

After this jquery code we will get an working effect on the images when we click on the image an big image comes up as shown in image below.


And when you click the next button in the right bottom you will see the next image as shown in image bellow.


Sunday, March 29, 2015

How to detectet the Browser (i.e. IE, Firefox, Safari, Chrome) ?

Browser detection - IE, Firefox, Safari,
Chrome Many times you require to put in browser-specific HTML / CSS in your files, because most often the pages are rendered differently (esp. IE). You can detect what browser the user is using with the help of PHP. In your PHP file, put the following code first:
  1. <?php
  2. $msie = strpos($_SERVER["HTTP_USER_AGENT"], 'MSIE') ? true : false;
  3. $firefox = strpos($_SERVER["HTTP_USER_AGENT"], 'Firefox') ? true : false;
  4. $safari = strpos($_SERVER["HTTP_USER_AGENT"], 'Safari') ? true : false;
  5. $chrome = strpos($_SERVER["HTTP_USER_AGENT"], 'Chrome') ? true : false;
  6. ?>
And to add, conditional HTML or CSS, put it like this:
  1. <?php
  2. //Firefox
  3. if ($firefox) {
  4. echo 'you are using Firefox!';
  5. echo '<br />';
  6. }
  7.  
  8. // Safari or Chrome. Both use the same engine - webkit
  9. if ($safari || $chrome) {
  10. echo 'you are using a webkit powered browser';
  11. echo '<br />';
  12. }
  13.  
  14. // IE
  15. if ($msie) {
  16. echo '<br>you are using Internet Explorer<br>';
  17. echo '<br />';
  18. }
  19.  
  20. // Not IE and for all other browsers
  21. if (!$msie) {
  22. echo '<br>you are not using Internet Explorer<br>';
  23. echo '<br />';
  24. }
  25.  
  26. // Add inline css
  27. if ($firefox) {
  28. echo '<style type="text/css">';
  29. echo '.mydiv {position:relative; width:100px; height:50px;}';
  30. echo '</style>';
  31. }
  32. ?>

Friday, March 27, 2015

Install XAMPP Stack On Ubuntu 14.04

XAMPP is a free, open source Apache distribution for GNU/ Linux, Windows, and Mac operating systems. It contains Apache web server, MySQL database, PHP, and Perl. The main goal of XAMPP is to build an easy to install Apache environment for developers. Unlike LAMP, and LEMP stacks, It makes the developers so easy to have all packages installed at once in a couple of minutes. XAMMP is acronym of X(Cross platform), MySQL, PHP, and Perl.
In this handy tutorial, let us setup XAMPP stack on a Ubuntu 14.04 LTS minimal server.

Install XAMPP

Download the latest version from the official download page. At the time writing this article, the latest version was 1.8.3. After downloading the XAMPP package, make it executable as shown below.

sudo chmod +x xampp-linux-1.8.3-4-installer.run
 
Now, install XAMPP stack as shown below.

sudo ./xampp-linux-1.8.3-4-installer.run

You’ll be asked a couple questions. Press Y to accept the defaults.
----------------------------------------------------------------------------
Welcome to the XAMPP Setup Wizard.

----------------------------------------------------------------------------
Select the components you want to install; clear the components you do not want 
to install. Click Next when you are ready to continue.

XAMPP Core Files : Y (Cannot be edited)

XAMPP Developer Files [Y/n] :y

Is the selection above correct? [Y/n]: y

----------------------------------------------------------------------------
Installation Directory

XAMPP will be installed to /opt/lampp
Press [Enter] to continue :

----------------------------------------------------------------------------
Setup is now ready to begin installing XAMPP on your computer.

Do you want to continue? [Y/n]: y

----------------------------------------------------------------------------
Please wait while Setup installs XAMPP on your computer.

 Installing
 0% ______________ 50% ______________ 100%
 #########################################

----------------------------------------------------------------------------
Setup has finished installing XAMPP on your computer.

Starting/Stopping XAMPP Server

XAMPP will be installed in /opt/lampp directory. After installing XAMPP, you can start it using the following command.
 
sudo /opt/lampp/lampp start

Sample output:

Starting XAMPP for Linux 1.8.3-4...
XAMPP: Starting Apache...already running.
XAMPP: Starting MySQL...ok.
XAMPP: Starting ProFTPD...ok.

Like wise, you can stop the service as shown below.
 
sudo /opt/lampp/lampp stop

Sample output:

Stopping XAMPP for Linux 1.8.3-4...
XAMPP: Stopping Apache...ok.
XAMPP: Stopping MySQL...ok.
XAMPP: Stopping ProFTPD...ok.

Test XAMPP

To check if everything is OK, open up your web browser, and navigate to http://ip-address/xampp.
You may get the following error. This is because, the XAMPP test page is not accessible from the remote clients.
To resolve this error, edit file /opt/lampp/etc/extra/httpd-xampp.conf,
 
sudo nano /opt/lampp/etc/extra/httpd-xampp.conf

Find the following line:
[...]
Require local
[...]
And, comment it out:
[...]
#Require local
[...]

For more details, refer the XAMPP forum.
Restart XAMPP service.
 
sudo /opt/lampp/lampp restart

Now, you’ll be able to access the XAMPP test page.

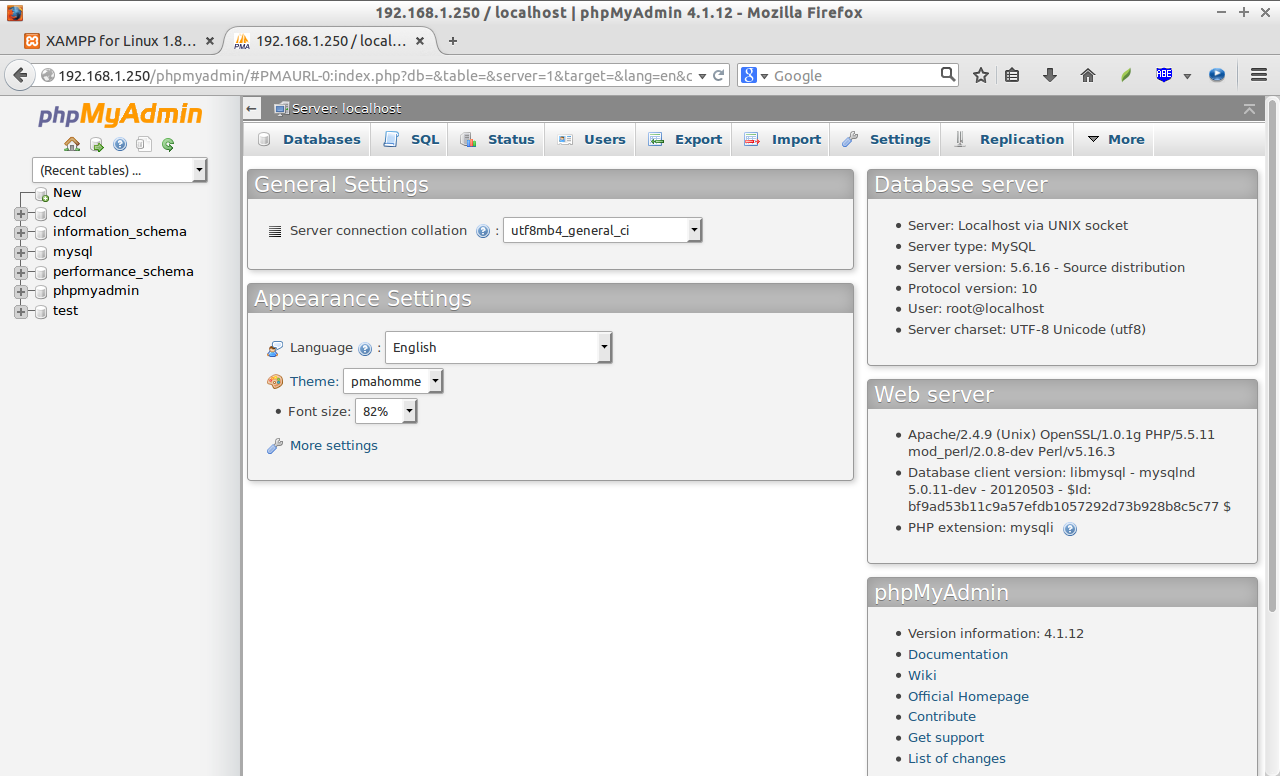
Access phpMyAdmin

phpMyAdmin is a graphical management tool for MySQL. Using this tool, you can create/delete/modify mysql databases graphically via a web browser.
To access phpMyAdmin, navigate to http://ip-address/phpmyadmin.

Viewing Statistics of the XAMPP server

XAMPP comes with pre-installed webalizer application which is a fast, free web server log file analysis program. It displays the web server usage reports in HTML format with a web browser. 
To access webalizer, go to URL: http://ip-address/webalizer.

Security Issues of XAMPP

Don’t attempt to use XAMPP in production environments. It is not meant for production use, but only for development purpose. The way XAMPP is configured is to be open as possible to allow the developers anything they want. For development environments this is great but in a production environment, it could be fatal.
Here a list of missing security in XAMPP:
  • The MySQL administrator (root) has no password.
  • The MySQL daemon is accessible via network.
  • ProFTPD uses the password “lampp” for user “daemon”.
  • PhpMyAdmin is accessible via network.
  • Examples are accessible via network.
To fix the above security holes, enter the following command:
sudo /opt/lampp/lampp security
You’ll be asked a couple of questions to secure the XAMPP installation. Answer the questions accordingly.
XAMPP:  Quick security check...
XAMPP:  Your XAMPP pages are NOT secured by a password. 
XAMPP: Do you want to set a password? [yes] 
XAMPP: Password: 
XAMPP: Password (again): 
XAMPP:  Password protection active. Please use 'xampp' as user name!
XAMPP:  MySQL is accessable via network. 
XAMPP: Normaly that's not recommended. Do you want me to turn it off? [yes] 
XAMPP:  Turned off.
XAMPP: Stopping MySQL...ok.
XAMPP: Starting MySQL...ok.
XAMPP:  MySQL has to run before I can check the security.
XAMPP:  MySQL has a root passwort set. Fine! :)
XAMPP:  The FTP password for user 'daemon' is still set to 'xampp'. 
XAMPP: Do you want to change the password? [yes] 
XAMPP: Password: 
XAMPP: Password (again): 
XAMPP: Reload ProFTPD...ok.
XAMPP:  Done.
That’s it. Now your XAMPP server is bit secure than before.

How to disable the Autorun functionality in Windows

Use either of the following methods:

Method 1
  1. Click Start the Start button
, type Gpedit.msc in the Start Search box, and then press ENTER.

    User Account Control permission
If you are prompted for an administrator password or for confirmation, type the password, or click Allow.
  2. Under Computer Configuration, expand Administrative Templates, expand Windows Components, and then click Autoplay Policies.
  3. In the Details pane, double-click Turn off Autoplay.
  4. Click Enabled, and then select All drives in the Turn off Autoplay box to disable Autorun on all drives.
  5. Restart the computer.
Method 2
  1. Click Start the Start button
, type Gpedit.msc in the Start Search box, and then press ENTER.

    User Account Control permissionIf you are prompted for an administrator password or for confirmation, type the password, or click Allow.
  2. Under Computer Configuration, expand Administrative Templates, expand Windows Components, and then click Autoplay Policies.
  3. In the Details pane, double-click Default Behavior for AutoRun.
  4. Click Enabled, and then select Do not execute any autorun commands in the Default Autorun behavior box to disable Autorun on all drives.
  5. Restart the computer.

Wednesday, March 25, 2015

How to Change the Apache Port in XAMPP?

Follow these steps to change the XAMPP server port number:
  1. Stop the XAMPP server, if it is running already.
  2. Open the file [XAMPP Installation Folder]/apache/conf/httpd.conf.
  3. Now search for the string Listen 80 (I’m assuming that your XAMPP was using the port 80. Otherwise, just search for the string ‘Listen’). This is the port number which XAMPP uses. Change this 80 to any other number which you prefer.
  4. Then search for the string ServerName and update the port number there also.
  5. Now save and re-start XAMPP server and you are done.

Why do we need to change the port number?

Because, these days, it is very common that a web developer needs to have multiple web servers running, all at the same time. For example, an XAMPP server can be used to run the local WordPress blog, while a JBoss server also needs to be up for testing a java web applications. In such scenarios, if two or more servers are trying to use the same port number, then the late comer will fail to get the port. So, it becomes necessary to change any one server’s port number to avoid the conflict.