Friday, December 25, 2015

How to Find Long-Lost Passwords Hiding In Your Browser?

Wait just a second before clicking that 'Forgot password?' link—chances are that your browser has your password stored somewhere in the depths of its memory. Head to your browser's cache of login details if you can't recall your credentials, or you're signing in on a new device altogether.
If you've switched on the magical password managing function in Chrome, Firefox, Internet Explorer or Safari, then your details should automatically appear when you visit the site again. There are reasons why this might not happen though: If you've switched browsers, cleared out your cookies, logged in from a different page or left it a couple of years between logins then the data might not appear as you expect it to.
A code change on the site's end can confuse your browser too, preventing it from serving up the right username and password combination when you need it. For all of these times, plus those occasions when you're logging in on a new computer or mobile device, you can delve into your browser's memory rather than going through a tedious reset process. Here's how to do it, assuming of course your browser's password management feature has been enabled in the first place.

Chrome

In Google Chrome, open the Settings link from the main menu and choose Show advanced settings. Click Manage passwords to bring up a list. If there are a lot of entries here, use the search box to look for part of a URL. You can then click on an entry and select Show to see the password—Chrome will prompt you for the username associated with your Windows or Mac account to prove you are who you say you are before showing the password.

Firefox

If Firefox is your browser of choice, choose Options then Options from the menu. Switch to Security and click the button marked Saved Passwords or Saved Lgin to bring up the database. Again, you can search for entries or simply scroll down the list. Click Show Passwords to reveal your login information. Anyone you can sit down at your computer can go through the same process, which is another good reason to protect your OS user account with a password.

Internet Explorer

Still rocking Microsoft's venerable old browser? You need to head to Control Panel, then search for "Credential Manager"—click Manage Web Credentials when the results appear on screen. Expand the entry of the site you want to look at and choose Show next to the starred out password. You'll be prompted for your Windows user account password as an extra level of security, and if you can prove your identity then the password will be displayed on screen.

Safari

Finally, Apple's browser. From the Safari menu pick Preferences and open up the Passwords tab. You can scroll down through the entries in the list or use the search box to find something specific. Tick the box marked Show passwords for selected websites, enter your Mac OS user account password, and the details for the currently selected site appear on screen. That should give you everything you need to log into the site or app you're using.

Tuesday, August 18, 2015

Free Anytime Upgrade For Windows 7 [100% Working]


Are you a Windows 7 user? And is it comes preloaded when you buy your laptop or have you bought the Windows 7 genuine version?  If its preloaded with a laptop then it’s very natural that its either Windows 7 Home Basic or Windows 7  Home Premium.
As Normally, laptop manufacturer provides this two version.  But there are lots of limitations in Windows 7 Home basic like don’t apply themes. Now you can break these limitations.
Today we will tell about a new trick to upgrading your genuine windows 7  any version of Windows 7 like Home Premium, Professional or the most favorite Ultimate Version. Yup, you can freely upgrade your genuine Windows 7 Home Basic or Home Premium to Windows 7 Ultimate. After upgrade your Windows will remain genuine. So why waste money for Windows 7 Ultimate? Just buy windows 7 Home basic as its low price than other Windows 7 version, then upgrade it to Windows 7 Ultimate.

To upgrade your Windows 7 you just need follow these steps..
Warning : Some people faces Windows not genuine after upgrade. So I will recommend you if your Laptop comes with preloaded Windows 7 then try this otherwise just neglect it. ( P.S. – Try this trick at your own risk. )
Step1. First Connect Your PC to Internet.
Step 2. Then go to your control panel  and click on Windows Anytime Upgrade
Step 3. Here you will get a window asking you anytime upgrade keys
Step 4. Just copy paste this key, according to your version and click next. ( Keys are given at the end of the post)
Step 5. Now you will get a window like this, click on I accept

Step 6. Now click on Upgrade like this

Step 7. Now it will show Windows Anytime upgrading

Step 8. After a few minutes a window will open saying Windows upgraded successfully

If you got any problem use another key and try, sometimes it may say that it failed in step 8 but got success in step 5 and 6 then just restart your PC and see the magic. Please share this post on Facebook or twitter. That’s I need from you.
Here are the keys you need to upgrade!!

Windows 7 Home Premium:  
6RBBT-F8VPQ-QCVPQ-KHRB8-RMV82
Windows 7 Professional:        
 1> VTDC3-WM7HP-XMPMX-K4YQ2-WYGJ8                                                                         
2> 6RQ9V-6GCG4-8WV2H-966GF-DQ4DW         
 3> 32KD2-K9CTF-M3DJT-4J3WC-733WD
                                
Windows 7 Ultimate Key:
1> FJGCP-4DFJD-GJY49-VJBQ7-HYRR2   2> 342DG-6YJR8-X92GV-V7DCV-P4K27

Thursday, June 11, 2015

Make a HTML, CSS, JS try it yourself editor.

Making a try it yourself editor is a very easy and 5 minutes task if you know the concept behind it. Here I’m telling you step by step to create a try it yourself editor like w3 schools that would be able to run your HTML, CSS and javascript code online and display the result in iframe.

The idea behind a try it yourself editor is more simpler than your thought. We just create a button, textarea and a iframe on the page and on click event of the button, load the content of textarea to iframe using JavaScript and all is done! So simple, let’s do it…

<!DOCTYPE HTML>
<html>
<head>
<meta http-equiv="Content-Type" content="text/html; charset=utf-8">
<title>Try it yourself editor</title>
<style type="text/css">
textarea, iframe {
    border: 2px solid #ddd;
    height: 500px;
    width: 100%;  
}
  </style>
</head>
 <body>

 <table width="100%" border="0" cellspacing="5" cellpadding="5">
 <tr>
 <td width="50%" scope="col">&nbsp;</td>
 <td width="50%" align="left" scope="col">
 <input onclick="runCode();" type="button" value="Run Code">
 </td>
 </tr>

 <tr>
 <td> 

 <form>
 <strong>Code</strong>

 <textarea name="sourceCode" id="sourceCode">


 <html>
 <head>
 <title>Hello</title>
 </head>

 <body>
 <h1>Hello!</h1>
<p>Write HTML, CSS or JavaScript code here and click 'Run Code'.</p>
 </body>
 </html>
 </textarea>
 </form>
 </td>
<td><strong>Output</strong><iframe name="targetCode" id="targetCode"></iframe></td>
</tr>
</table>  


<script type="text/javascript">
   function runCode(){
   var content = document.getElementById('sourceCode').value;
   var iframe = document.getElementById('targetCode');
   iframe = (iframe.contentWindow) ? iframe.contentWindow : (iframe.contentDocument.document) ? iframe.contentDocument.document : iframe.contentDocument;
   iframe.document.open();
   iframe.document.write(content);
   iframe.document.close();
   return false;
   }
   runCode();
</script>
</body>
</html>

Wednesday, May 13, 2015

How to remove watermark in amazing slider in wordpress?

When I saw it, I said wow, it is awesome, but after using it, there was a watermark on the images,
which make everything looks bad. so i told my self I had to share this with the world. it cost $249

 inside sliderengine folder open amazingslider.js file with any editor and search for this 


And then search for


Line no. 300 there will a variable wpocss and infront of it there will be written 

display:block !important;

Change it to:-

display:none !important; 

Friday, April 10, 2015

Icons and Splash Screens

 Usage and Additional Information

The following is a list of the currently supported icon and splash screens supported for this release of Cordova/Phonegap on PhoneGap Build.

Unless otherwise specified in a config.xml, each platform will try to use the default icon.png during compilation. To define platform specific icons please use the guide provided below.

Icon files should be the file formats specified in the examples below, other file types are not guaranteed to work across platforms.

<icon>
  

You can have zero or more of these elements present in your config.xml. If you do not specify a icon then the PhoneGap logo will be used as your application's icon.

src: (required) specifies the location of the image file, relative to your www directory

width: (optional) but recommended to include, width in pixels

height: (optional) but recommended to include, height in pixels
Default

The default icon must be named icon.png and must reside in the root of your application folder.

<icon src="icon.png" />

iOS

We support classic, retina, iPhone 5 and iPad displays.

The names below reflect the names of the destination files when they are added to the application. During app submittal you may get feedback that has a reference to these filenames.
iOS 7.0+

<!-- iPhone 6 / 6+ -->
<icon src="icon-60@3x.png" gap:platform="ios" width="180" height="180" />
<!-- iPhone / iPod Touch  -->
<icon src="icon-60.png" gap:platform="ios" width="60" height="60" />
<icon src="icon-60@2x.png" gap:platform="ios" width="120" height="120" />
<!-- iPad -->
<icon src="icon-76.png" gap:platform="ios" width="76" height="76" />
<icon src="icon-76@2x.png" gap:platform="ios" width="152" height="152" />
<!-- Settings Icon -->
<icon src="icon-small.png" gap:platform="ios" width="29" height="29" />
<icon src="icon-small@2x.png" gap:platform="ios" width="58" height="58" />
<!-- Spotlight Icon -->
<icon src="icon-40.png" gap:platform="ios" width="40" height="40" />
<icon src="icon-40@2x.png" gap:platform="ios" width="80" height="80" />

iOS 6.1

<!-- iPhone / iPod Touch -->
<icon src="icon.png" gap:platform="ios" width="57" height="57" />
<icon src="icon@2x.png" gap:platform="ios" width="114" height="114" />
<!-- iPad -->
<icon src="icon-72.png" gap:platform="ios" width="72" height="72" />
<icon src="icon-72@2x.png" gap:platform="ios" width="144" height="144" />
<!-- iPhone Spotlight and Settings Icon -->
<icon src="icon-small.png" gap:platform="ios" width="29" height="29" />
<icon src="icon-small@2x.png" gap:platform="ios" width="58" height="58" />
<!-- iPad Spotlight and Settings Icon -->
<icon src="icon-50.png" gap:platform="ios" width="50" height="50" />
<icon src="icon-50@2x.png" gap:platform="ios" width="100" height="100" />

Android

We support all Android resource qualifiers. Commonly used qualifiers refer to device density and language.

<icon src="ldpi.png" gap:platform="android" gap:qualifier="ldpi" />
<icon src="mdpi.png" gap:platform="android" gap:qualifier="mdpi" />
<icon src="hdpi.png" gap:platform="android" gap:qualifier="hdpi" />
<icon src="xhdpi.png" gap:platform="android" gap:qualifier="xhdpi" />
<icon src="xxhdpi.png" gap:platform="android" gap:qualifier="xxhdpi" />
<icon src="fr-xxhdpi.png" gap:platform="android" gap:qualifier="fr-xxhdpi" />

A list of these qualifiers can be viewed on Table-2 here. Note that compound qualifiers (eg. "port-xhdpi") have to

be in the same order as viewed on this table.

We also support the deprecated gap:density attribute that will only support the following densities:

<icon src="ldpi.png" gap:platform="android" gap:density="ldpi" />
<icon src="mdpi.png" gap:platform="android" gap:density="mdpi" />
<icon src="hdpi.png" gap:platform="android" gap:density="hdpi" />
<icon src="xhdpi.png" gap:platform="android" gap:density="xhdpi" />
<icon src="xxhdpi.png" gap:platform="android" gap:density="xxhdpi" />

We do not recommend using this attribute as the above gap:qualifer attribute offers more flexibility and more importantly, future support of new screen sizes etc.
Windows Phone

We support two icons for Windows Phone, a regular icon and a tile image.

<icon src="icon.png" gap:platform="winphone" />
<icon src="tileicon.png" gap:platform="winphone" gap:role="background" />

Splash Screens

You can have zero or more of these elements present in your config.xml. This element can have src, gap:platform, width and height attributes, just like the <icon> element above. Like icon files, your splash screens should be saved as png files.

<gap:splash src="splash/ios/Default-568h@2x~iphone.png" gap:platform="ios" width="320" height="480" />

Usage and Additional Information:

Unless otherwise specified in a config.xml, each platform will try to use the default splash.png during compilation. To define platform specific splash screens please use the guide provided below.

Splash files should be the file formats specified in the examples below. Any other file type is not guaranteed to work across platforms.
Warning:

If you do not supply the gap:platform attribute, the referenced image will be copied to ALL platforms, increasing the size of their application packages.
Default

The default splash must be named splash.png and must reside in the root of your application folder.

<gap:splash src="splash.png" />

iOS

We support classic, retina, iPhone 5 and iPad displays; the following will define splash screens for each of those. Standard iPads have two different splash screens, portrait, landscape. Retina iPads have two additional splash screens, retina portrait and retina landscape.

The names below reflect the names of the destination files when they are added to the application. During app submittal you may get feedback that has a reference to these filenames.

<!-- iPhone and iPod touch -->
<gap:splash src="Default.png" gap:platform="ios" width="320" height="480" />
<gap:splash src="Default@2x.png" gap:platform="ios" width="640" height="960" />
<!-- iPhone 5 / iPod Touch (5th Generation) -->
<gap:splash src="Default-568h@2x.png" gap:platform="ios" width="640" height="1136" />
<!-- iPhone 6 -->
<gap:splash src="Default-667h@2x.png" gap:platform="ios" width="750" height="1334" />
<gap:splash src="Default-Portrait-736h@3x.png" gap:platform="ios" width="1242" height="2208" />
<gap:splash src="Default-Landscape-736h@3x.png" gap:platform="ios" width="2208" height="1242" />
<!-- iPad -->
<gap:splash src="Default-Portrait.png" gap:platform="ios" width="768" height="1024" />
<gap:splash src="Default-Landscape.png" gap:platform="ios" width="1024" height="768" />
<!-- Retina iPad -->
<gap:splash src="Default-Portrait@2x.png" gap:platform="ios" width="1536" height="2048" />
<gap:splash src="Default-Landscape@2x.png" gap:platform="ios" width="2048" height="1536" />

Android

We support all Android resource qualifiers. Commonly used qualifiers refer to device orientation, language and density.

<gap:splash src="ldpi.png" gap:platform="android" gap:qualifier="ldpi" />
<gap:splash src="mdpi.png" gap:platform="android" gap:qualifier="mdpi" />
<gap:splash src="hdpi.png" gap:platform="android" gap:qualifier="hdpi" />
<gap:splash src="xhdpi.png" gap:platform="android" gap:qualifier="xhdpi" />
<gap:splash src="fr-xhdpi.png" gap:platform="android" gap:qualifier="fr-xhdpi" />
<gap:splash src="portrait-xxhdpi.png" gap:platform="android" gap:qualifier="port-xxhdpi" />
<gap:splash src="landscape-xxhdpi.png" gap:platform="android" gap:qualifier="land-xxhdpi" />

A list of these qualifiers can be viewed on Table-2 here. Note that compound qualifiers (eg. "port-xhdpi") have to

be in the same order as viewed on this table.

Patch-9 backgrounds are supported. All patch-9 files have to have a ".9.png" suffix.

We also support the deprecated gap:density attribute that will only support the following densities:

<gap:splash src="ldpi.png" gap:platform="android" gap:density="ldpi" />
<gap:splash src="mdpi.png" gap:platform="android" gap:density="mdpi" />
<gap:splash src="hdpi.png" gap:platform="android" gap:density="hdpi" />
<gap:splash src="xhdpi.png" gap:platform="android" gap:density="xhdpi" />
<gap:splash src="xxhdpi.png" gap:platform="android" gap:density="xxhdpi" />

We do not recommend using this attribute as the above gap:qualifer offers more flexibility and more importantly, future support of new screen sizes etc.
Windows Phone

Windows Phone supports a single splash image and can be defined as below. Unlike the other supported platforms, Windows Phone splash screen should be in jpg format

<gap:splash src="splash/winphone/splash.jpg" gap:platform="winphone" />

How to create an SlideShow of images on click using jquery?

How to create an SlideShow of images on click using jquery?

To create an SlideShow of images on click using jquery we need to fist create an html page with image and some images in our folder as shown in below code.

<html>
<head>
<tittle> Slidshow</tittle>
<script src="jquery.min.js"></script>
<script src="coustom.js"></script>

</head>
<body>
<img class="play" src="img/button_play.png">
<img class="pause" src="img/button_pause.png">

<img class="slide" src="img/1.jpg">
</body>
</html>

In our above code we have three images one for Play, Pause and third is our image.Each image is given one class named as play, pause and slide respectively.

In the next step we create an custom.js file where we will give our js code which would be as followed.

Var d=1;
$(".play").click(function(){
        $(".slide").attr('src', 'img/'+d+'.jpg');
        i=parseInt(d) + 1;
        t= setInterval(function(){ 
        $(".slide").fadeOut(1000, function () {
        $(".slide").attr('src', 'img/'+[i++]+'.jpg');
        $(".slide").fadeIn(1000);
    });
    if(i == lastimgno)
    i = 1;
    }, 5000); 
});     


    $(".pause").click(function(){
        clearInterval(t);
    });


In above js code we changed the source of the image on click of the class or we can say that on click of the image.

When we click on the play image we would get the slid show started where the images get changed after an interval of 5000 which means after 5 sec. This time can be changed according to your requirements.

And when we click on the pause image we distroy the interval set when we clicked on the play button.

Thats what the code is.

If it helped you than just make the comments. Any query please comment.

Thursday, April 09, 2015

How to use the PHP download Script?

How to Downlaod a pdf,jpg,png,doc or any other file buy just using the bellow script.

The below code is where the name of the file is displayed to be downloaded. 
 
<?php
    include("config.php");
       
    $query1 = "SELECT * FROM upload";
    $result = mysql_query($query1);
?>

<!DOCTYPE html PUBLIC "-//W3C//DTD XHTML 1.0 Transitional//EN" "http://www.w3.org/TR/xhtml1/DTD/xhtml1-transitional.dtd">
<html xmlns="http://www.w3.org/1999/xhtml">
<head>
<meta http-equiv="Content-Type" content="text/html; charset=utf-8" />
<title>File download</title>
</head>

<body>


<?php
while($row1=mysql_fetch_array($result))
{
    $name=$row1['name'];
   
    ?>
<center>
<a href="download1.php?filename=<?php echo $name ;?>" >
<?php echo $name ;?></a><br />
</center>
<?php }?>


</body>
</html>


Now we will write the script for downloading a file:-

<?php

function output_file($file, $name, $mime_type='')
{
 
 //Check the file premission
 if(!is_readable($file)) die('File not found or inaccessible!');

 $size = filesize($file);
 $name = rawurldecode($name);

 /* Figure out the MIME type | Check in array */
 $known_mime_types=array(
     "pdf" => "application/pdf",
     "txt" => "text/plain",
     "html" => "text/html",
     "htm" => "text/html",
    "exe" => "application/octet-stream",
    "zip" => "application/zip",
    "doc" => "application/msword",
    "xls" => "application/vnd.ms-excel",
    "ppt" => "application/vnd.ms-powerpoint",
    "gif" => "image/gif",
    "png" => "image/png",
    "jpeg"=> "image/jpg",
    "jpg" =>  "image/jpg",
    "php" => "text/plain"
 );

 if($mime_type==''){
     $file_extension = strtolower(substr(strrchr($file,"."),1));
     if(array_key_exists($file_extension, $known_mime_types)){
        $mime_type=$known_mime_types[$file_extension];
     } else {
        $mime_type="application/force-download";
     };
 };

 //turn off output buffering to decrease cpu usage
 @ob_end_clean();

 // required for IE, otherwise Content-Disposition may be ignored
 if(ini_get('zlib.output_compression'))
  ini_set('zlib.output_compression', 'Off');

 header('Content-Type: ' . $mime_type);
 header('Content-Disposition: attachment; filename="'.$name.'"');
 header("Content-Transfer-Encoding: binary");
 header('Accept-Ranges: bytes');

 /* The three lines below basically make the
    download non-cacheable */
 header("Cache-control: private");
 header('Pragma: private');
 header("Expires: Mon, 26 Jul 1997 05:00:00 GMT");

 // multipart-download and download resuming support
 if(isset($_SERVER['HTTP_RANGE']))
 {
    list($a, $range) = explode("=",$_SERVER['HTTP_RANGE'],2);
    list($range) = explode(",",$range,2);
    list($range, $range_end) = explode("-", $range);
    $range=intval($range);
    if(!$range_end) {
        $range_end=$size-1;
    } else {
        $range_end=intval($range_end);
    }

    $new_length = $range_end-$range+1;
    header("HTTP/1.1 206 Partial Content");
    header("Content-Length: $new_length");
    header("Content-Range: bytes $range-$range_end/$size");
 } else {
    $new_length=$size;
    header("Content-Length: ".$size);
 }

 /* Will output the file itself */
 $chunksize = 1*(1024*1024); //you may want to change this
 $bytes_send = 0;
 if ($file = fopen($file, 'r'))
 {
    if(isset($_SERVER['HTTP_RANGE']))
    fseek($file, $range);

    while(!feof($file) &&
        (!connection_aborted()) &&
        ($bytes_send<$new_length)
          )
    {
        $buffer = fread($file, $chunksize);
        print($buffer); //echo($buffer); // can also possible
        flush();
        $bytes_send += strlen($buffer);
    }
 fclose($file);
 } else
 //If no permissiion
 die('Error - can not open file.');
 //die
die();
}
//Set the time out
set_time_limit(0);

//path to the file
$file_path='admin/files/'.$_REQUEST['filename'];


//Call the download function with file path,file name and file type
output_file($file_path, ''.$_REQUEST['filename'].'', 'text/plain');
?>

Monday, March 30, 2015

How to create a Gallery using HTML, CSS, jquery?

I am going to tell you to how to create a simple Gallery using HTML, CSS, Jquery. For this task you would need some images and knowlege of css and jquery.

There are some steps in creating it.

Step 1:-

First we create an index.html which would be our default page.

In index.html we create two divs. In which 1st div will contain the images to be displayed when we run index.html. The code goes like this:-

<div class="container">
<img src="img/1.jpg" width='200' data-img-no="0">
<img src="img/2.jpg" width='200' data-img-no="1" >
<img src="img/3.jpg" width='200' data-img-no="2">
<img src="img/4.jpg" width='200' data-img-no="3">
</div>

Here the data-img-no is the no given to each image.

Step 2:-

Now, we create a another div which will be display none by default but gets displayed when we click on an image.

This div will be:-

<div class="show">
<div class="prev">
<p>Prev</p>
</div>
<img class="close" src="img/1.jpg"  data-img-no="0">
<img class="close" src="img/2.jpg"  data-img-no="1">
<img class="close" src="img/3.jpg"  data-img-no="2">
<img class="close" src="img/4.jpg"  data-img-no="3">
<div class="next">
<p>Next</p>
</div>
</div>

In above div we again have 4 images with data-img-no same as the data-img-no in Step 1.
Here we have two Buttons or divs with name as next and prev which will be used for moving forward and backward the images.


Step 3:-

In this step we will give the above dives an custom css which goes as:-


.container
{
margin:0px auto;
width:820px;
margin-top:50px;
}
.container img
{
cursor:pointer;
}
.popup
{
position:absolute;
background:rgba(255,0,0,0.4);
width:100%;
height:100%;
top:0px;

}
.close
{
display:none;
cursor:pointer;

}

.show
{
display:none;

}
.close img
{
width:100px;
}
.prev
{
cursor:pointer;
float:left;

}
.next
{
cursor:pointer;
float:right;

}

after the step 3 we will get the index.html as shown below:-

 Now we move on to step 4 which is the most important part.

Step 4:-

Here we will give the our jquery code. In jquery code we will define the function for what will happen if we click on the image , next button, prev button Which div will be shown and which div will be hidden.

$(document).ready(function(){
var d;
var j=$(".container img:first").attr('data-img-no');
var i=$(".container img:last").attr('data-img-no');

    $("img").click(function(){
        d=$(this).attr('data-img-no');
        $(".show").addClass('popup');
        $(".close[data-img-no="+d+"]").css({display:"block",width:"50%",margin:"0px auto"});
        $(".show").css({display:"block"});
    });
   

    $(".next").click(function(){
    if(d < i)
    {
        d=parseInt(d) + 1;
        $(".close").css({display:"none"});
        $(".close[data-img-no="+d+"]").css({display:"block",width:"50%",margin:"0px auto"});
        $(".show").css({display:"block"});
    }
    });

    $(".prev").click(function(){
    if(d > j)
    {
        d=parseInt(d) - 1;
        $(".close").css({display:"none"});
        $(".close[data-img-no="+d+"]").css({display:"block",width:"50%",margin:"0px auto"});
        $(".show").css({display:"block"});
    }
    });
   
    $(".close").click(function(){
        $(".show").removeClass('popup');
        $(".close").css({display:"none"});
        $(".show").css({display:"none"});
    });
   
});

After this jquery code we will get an working effect on the images when we click on the image an big image comes up as shown in image below.


And when you click the next button in the right bottom you will see the next image as shown in image bellow.


Sunday, March 29, 2015

How to detectet the Browser (i.e. IE, Firefox, Safari, Chrome) ?

Browser detection - IE, Firefox, Safari,
Chrome Many times you require to put in browser-specific HTML / CSS in your files, because most often the pages are rendered differently (esp. IE). You can detect what browser the user is using with the help of PHP. In your PHP file, put the following code first:
  1. <?php
  2. $msie = strpos($_SERVER["HTTP_USER_AGENT"], 'MSIE') ? true : false;
  3. $firefox = strpos($_SERVER["HTTP_USER_AGENT"], 'Firefox') ? true : false;
  4. $safari = strpos($_SERVER["HTTP_USER_AGENT"], 'Safari') ? true : false;
  5. $chrome = strpos($_SERVER["HTTP_USER_AGENT"], 'Chrome') ? true : false;
  6. ?>
And to add, conditional HTML or CSS, put it like this:
  1. <?php
  2. //Firefox
  3. if ($firefox) {
  4. echo 'you are using Firefox!';
  5. echo '<br />';
  6. }
  7.  
  8. // Safari or Chrome. Both use the same engine - webkit
  9. if ($safari || $chrome) {
  10. echo 'you are using a webkit powered browser';
  11. echo '<br />';
  12. }
  13.  
  14. // IE
  15. if ($msie) {
  16. echo '<br>you are using Internet Explorer<br>';
  17. echo '<br />';
  18. }
  19.  
  20. // Not IE and for all other browsers
  21. if (!$msie) {
  22. echo '<br>you are not using Internet Explorer<br>';
  23. echo '<br />';
  24. }
  25.  
  26. // Add inline css
  27. if ($firefox) {
  28. echo '<style type="text/css">';
  29. echo '.mydiv {position:relative; width:100px; height:50px;}';
  30. echo '</style>';
  31. }
  32. ?>

Friday, March 27, 2015

Install XAMPP Stack On Ubuntu 14.04

XAMPP is a free, open source Apache distribution for GNU/ Linux, Windows, and Mac operating systems. It contains Apache web server, MySQL database, PHP, and Perl. The main goal of XAMPP is to build an easy to install Apache environment for developers. Unlike LAMP, and LEMP stacks, It makes the developers so easy to have all packages installed at once in a couple of minutes. XAMMP is acronym of X(Cross platform), MySQL, PHP, and Perl.
In this handy tutorial, let us setup XAMPP stack on a Ubuntu 14.04 LTS minimal server.

Install XAMPP

Download the latest version from the official download page. At the time writing this article, the latest version was 1.8.3. After downloading the XAMPP package, make it executable as shown below.

sudo chmod +x xampp-linux-1.8.3-4-installer.run
 
Now, install XAMPP stack as shown below.

sudo ./xampp-linux-1.8.3-4-installer.run

You’ll be asked a couple questions. Press Y to accept the defaults.
----------------------------------------------------------------------------
Welcome to the XAMPP Setup Wizard.

----------------------------------------------------------------------------
Select the components you want to install; clear the components you do not want 
to install. Click Next when you are ready to continue.

XAMPP Core Files : Y (Cannot be edited)

XAMPP Developer Files [Y/n] :y

Is the selection above correct? [Y/n]: y

----------------------------------------------------------------------------
Installation Directory

XAMPP will be installed to /opt/lampp
Press [Enter] to continue :

----------------------------------------------------------------------------
Setup is now ready to begin installing XAMPP on your computer.

Do you want to continue? [Y/n]: y

----------------------------------------------------------------------------
Please wait while Setup installs XAMPP on your computer.

 Installing
 0% ______________ 50% ______________ 100%
 #########################################

----------------------------------------------------------------------------
Setup has finished installing XAMPP on your computer.

Starting/Stopping XAMPP Server

XAMPP will be installed in /opt/lampp directory. After installing XAMPP, you can start it using the following command.
 
sudo /opt/lampp/lampp start

Sample output:

Starting XAMPP for Linux 1.8.3-4...
XAMPP: Starting Apache...already running.
XAMPP: Starting MySQL...ok.
XAMPP: Starting ProFTPD...ok.

Like wise, you can stop the service as shown below.
 
sudo /opt/lampp/lampp stop

Sample output:

Stopping XAMPP for Linux 1.8.3-4...
XAMPP: Stopping Apache...ok.
XAMPP: Stopping MySQL...ok.
XAMPP: Stopping ProFTPD...ok.

Test XAMPP

To check if everything is OK, open up your web browser, and navigate to http://ip-address/xampp.
You may get the following error. This is because, the XAMPP test page is not accessible from the remote clients.
To resolve this error, edit file /opt/lampp/etc/extra/httpd-xampp.conf,
 
sudo nano /opt/lampp/etc/extra/httpd-xampp.conf

Find the following line:
[...]
Require local
[...]
And, comment it out:
[...]
#Require local
[...]

For more details, refer the XAMPP forum.
Restart XAMPP service.
 
sudo /opt/lampp/lampp restart

Now, you’ll be able to access the XAMPP test page.
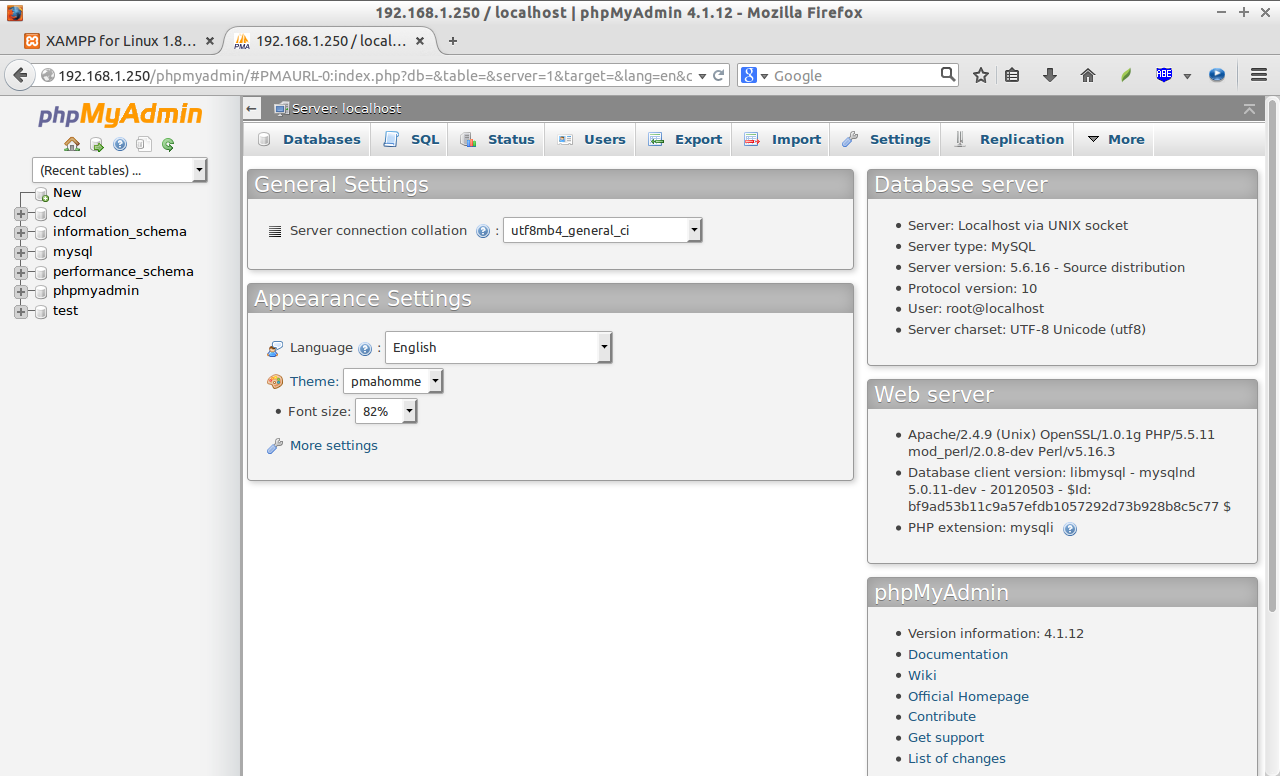
Access phpMyAdmin

phpMyAdmin is a graphical management tool for MySQL. Using this tool, you can create/delete/modify mysql databases graphically via a web browser.
To access phpMyAdmin, navigate to http://ip-address/phpmyadmin.

Viewing Statistics of the XAMPP server

XAMPP comes with pre-installed webalizer application which is a fast, free web server log file analysis program. It displays the web server usage reports in HTML format with a web browser. 
To access webalizer, go to URL: http://ip-address/webalizer.

Security Issues of XAMPP

Don’t attempt to use XAMPP in production environments. It is not meant for production use, but only for development purpose. The way XAMPP is configured is to be open as possible to allow the developers anything they want. For development environments this is great but in a production environment, it could be fatal.
Here a list of missing security in XAMPP:
  • The MySQL administrator (root) has no password.
  • The MySQL daemon is accessible via network.
  • ProFTPD uses the password “lampp” for user “daemon”.
  • PhpMyAdmin is accessible via network.
  • Examples are accessible via network.
To fix the above security holes, enter the following command:
sudo /opt/lampp/lampp security
You’ll be asked a couple of questions to secure the XAMPP installation. Answer the questions accordingly.
XAMPP:  Quick security check...
XAMPP:  Your XAMPP pages are NOT secured by a password. 
XAMPP: Do you want to set a password? [yes] 
XAMPP: Password: 
XAMPP: Password (again): 
XAMPP:  Password protection active. Please use 'xampp' as user name!
XAMPP:  MySQL is accessable via network. 
XAMPP: Normaly that's not recommended. Do you want me to turn it off? [yes] 
XAMPP:  Turned off.
XAMPP: Stopping MySQL...ok.
XAMPP: Starting MySQL...ok.
XAMPP:  MySQL has to run before I can check the security.
XAMPP:  MySQL has a root passwort set. Fine! :)
XAMPP:  The FTP password for user 'daemon' is still set to 'xampp'. 
XAMPP: Do you want to change the password? [yes] 
XAMPP: Password: 
XAMPP: Password (again): 
XAMPP: Reload ProFTPD...ok.
XAMPP:  Done.
That’s it. Now your XAMPP server is bit secure than before.